About

Why Image the Moon?
Imaging the Moon with a telescope and webcam is fun. Unlike other types of astrophotography, lunar astrophotography allows you to explore features down to the km scale. Apart from craters, there are towering mountains, volcanic domes, valleys cut by ancient lava flows, crater chains caused by multiple impacts, meandering wrinkle ridges, flooded "ghost" craters - the list goes on. Most of the images on this website were captured with my permanently-mounted 235mm (9¼") Celestron telescope and Imaging Source cameras. Under good sky conditions, resolutions down to 1 km can be achieved. The Image Gallery presents over 100 images organized into nine regions as defined on the Moon Atlas page. Setting Zoom to 125% can improve the gallery images on screens with small pixels. The appearance of the Moon is covered in the Lunar FAQs page. Recently I included a Visit Mars page to present IR and colour images of the red planet at opposition in 2014 and 2016. My Equipment is summarized below with more detail in the Techniques page.
About Me
I have had a keen interest in astronomy since the age of 12. I've worked in the biotech sector for over 25 years, I have a PhD in Organic Chemistry and I'm an amateur engineer. I've been posting all types of astro-images on CelestronImages.com for the past few years, but I have now decided to make a website dedicated to my lunar imaging. I observe and image from the suburbs of Melbourne, Australia (37° 52' South).
Equipment
Most of the images on this website were captured using my Celestron CPC-925-GPS. It is a 235 mm (9¼") Schmidt-Cassegrain telescope (SCT). It has very nice optics and is well collimated. It is also well baffled for a compound instrument. Under good seeing conditions it easily splits Sirius visually. The telescope is permanently mounted on an equatorial fork mount so that it can accurately follow the stars, Moon and planets. I have found the equatorial drive to be very reliable, especially since adding weights to the fork and telescope to balance the instrument in all positions and minimize the load on the driving gears. It is protected by a roll-off observatory built from a modified steel-framed glasshouse 1.8 m x 2.4 m (6' x 8'). In the day a 30 W solar panel drives a number of small fans that extract warm air from the observatory. Another set blow air onto the telescope. It can get very hot here in Summer! | 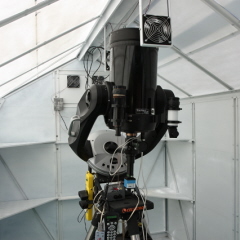 |
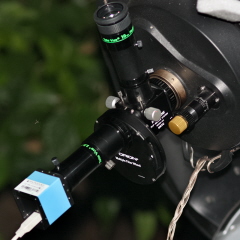 | I use Imaging Source monochrome cameras: the wider field DMK 41AU02 (1,280 x 960 pixels), and the more sensitive DMK 21AU618 (640 x 480 pixels). I have fitted Peltier coolers onto the cameras and typically run them at <0°C, which significantly improves the signal-to-noise ratio and suppresses hot pixels. The cameras are used with Astronomik Red-pass and IR-pass filters for the Moon and Red, Green and Blue-pass filters for planets. Just recently I've been trying a Baader 685 nm pass filter. For more detail, refer to Techniques. |
There is too much light pollution at my home so I don't image galaxies, nevertheless I sometimes image globular clusters and brighter nebulae using a modified Canon 450D. For wide field imaging, I use a Canon EF 300mm f/4.0 L USM Lens, which rides piggy-back on the 9¼" telescope as shown to the right. This lens produces sharp images right across the full frame. An autoguider is attached to the main instrument to maximize image quality for the longer exposures required. | 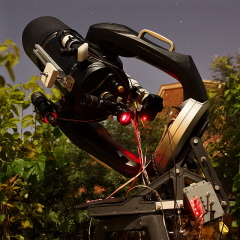 |